
Content
Patient Flow - Automation Settings
Online Appointment Booking Settings
Appointment Reminders campaign
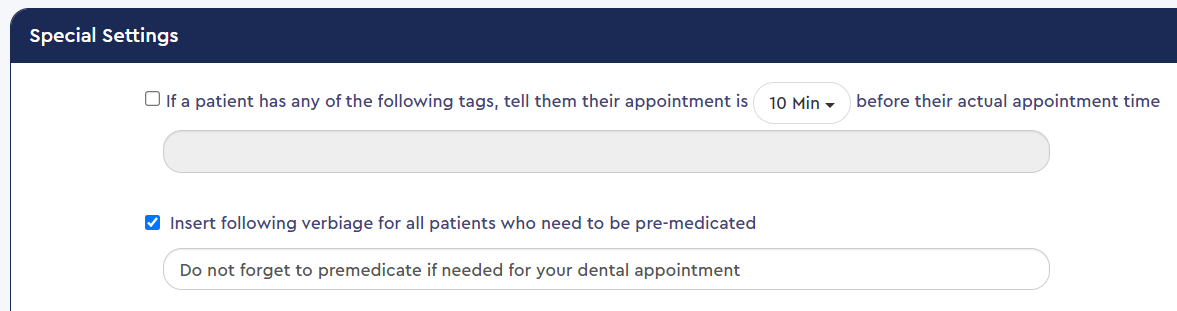
Premedicate
You can now message certain tagged patients pre-medicate messages via the Appointment Reminders Campaign. We will read the premedicate auto-tag listed for your patients through your PMS. To add this message, you will insert the merge tag to the email and SMS templates in the Appointment Reminders Campaign. To find this setting, go to Campaigns > Appointment Reminder Campaigns > Special Settings.

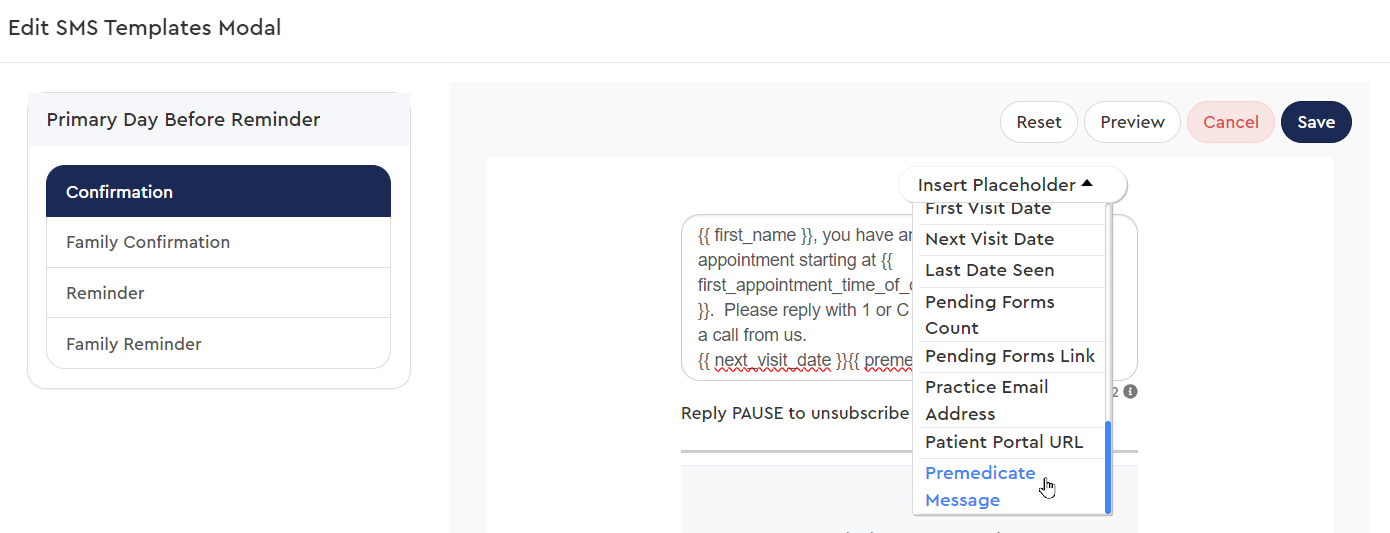
Once that option has been selected, you will be able to edit the SMS template you'd like to include in this message. And add the pre-medicate placeholder in the message template. *Note: you must click into the message to see the Insert Placeholder button.*

If the patient DOES NOT have a pre-medicate auto tag within your PMS, then the merge tag will have no value, and the verbiage will not be displayed.
You can click here for an in-depth guide on setting this up within your PMS.
Early Appointment Reminder
You can now ask tagged patients to show up 10 to 30 minutes before the time of their appointment. This will also be found under Special Settings in the Appointment Reminders Campaign. You will then want to ensure the patient is tagged through their Patient Overview.


Patient Flow
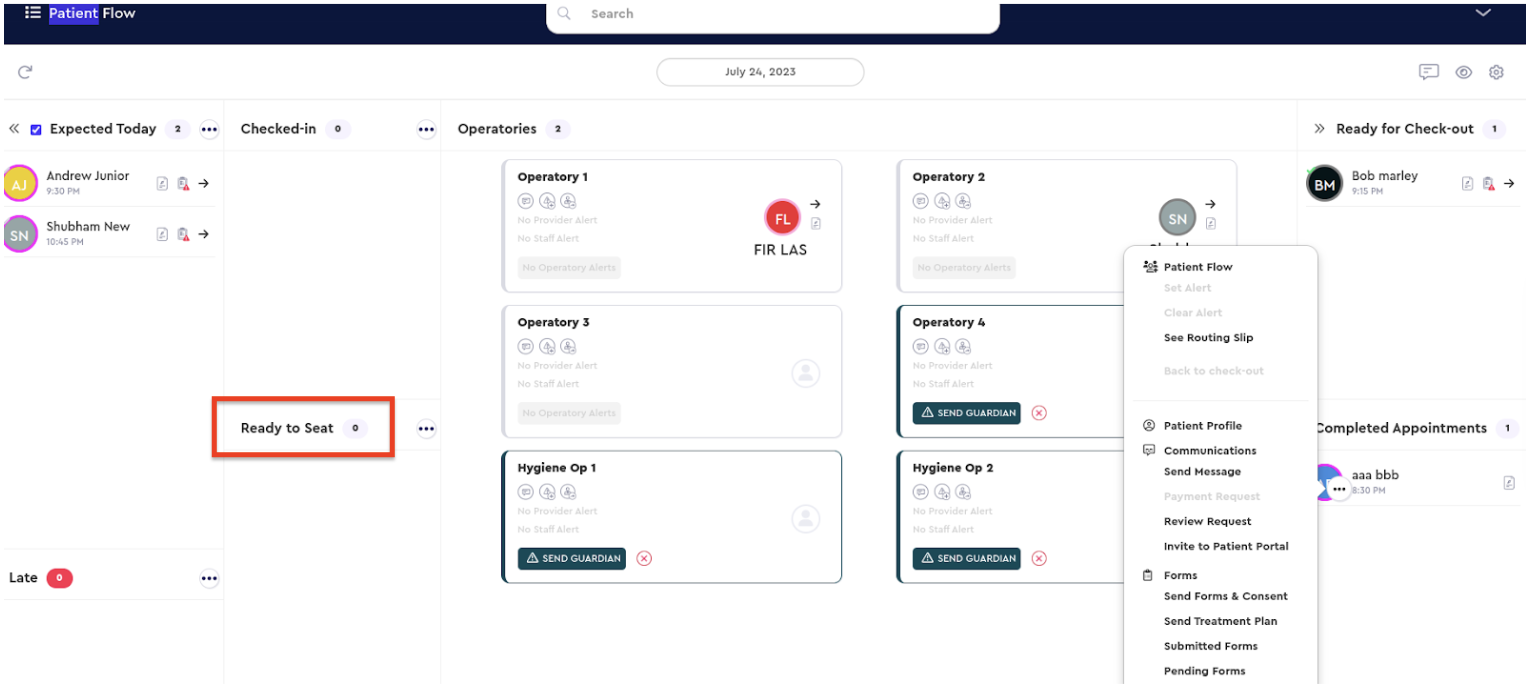
Ready to Seat
A new state called Ready to Seat has been added to the Patient Flow page, just below the Checked-in section. The Ready to Seat section will list patients who have either been marked as Ready in PMS (as specified in PMS transition settings), have no pending forms, have completed their pending forms, or are manually moved into this section. This area will differentiate between checked-in patients who are not ready to be seated and patients who are prepared to be seated. Using this section, the front office will be able to communicate with the back office that the patient is truly ready to be brought back. To view this setting, go to Operations on the bottom left of the PBN page.

Patient Flow Transition Settings
You can now map appointment status between PBN and your PMS. You can also select which transitions are allowed between PBN and your PMS. To edit these settings, go to Operations on the bottom left of the PBN page and choose the settings gear wheel at the top right.


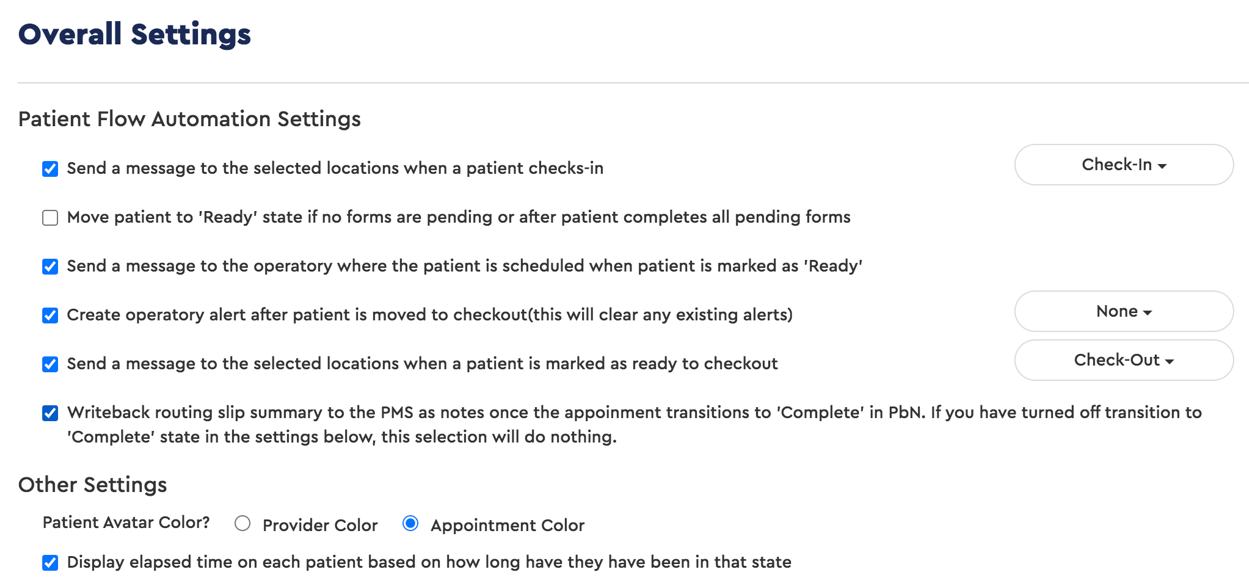
Patient Flow Automation Settings
You will also find this in the Patient Flow Settings, as shown above.
- You can send a message to selected locations when a patient checks in. So, a notification is automatically created for specific locations when a patient checks in.
- You can now have a patient be automatically moved to the Ready to Seat section if there are no pending forms or the patient completes all pending forms.
- You can now let the OP know where the patient is scheduled when the patient is marked as Ready.
- You can now create an Op alert automatically after the patient is moved to checkout to turn the room over / clean the room.
- You can now send a message to selected locations when a patient is marked ready to checkout.
- You can now have the routing slip summary written back into the PMS as notes once the appointment transitions to Complete in PBN so that information is stored in the patient's chart for future reference.
- You can now have the patient avatar color on the patient flow page match the Provider or Appointment colors.
Patient Flow User Interface Can Now be Condensed
You can now collapse the Expected and Ready for Checkout columns using the >> icon.

Huddle
Using the Routing slip icon, you can bring up the routing slip for patients from the Huddle page.


Using the new sidebar navigation item on the desktop app, you can now bring up the Huddle page on the Desktop app by selecting the icon that features two people, as seen below.
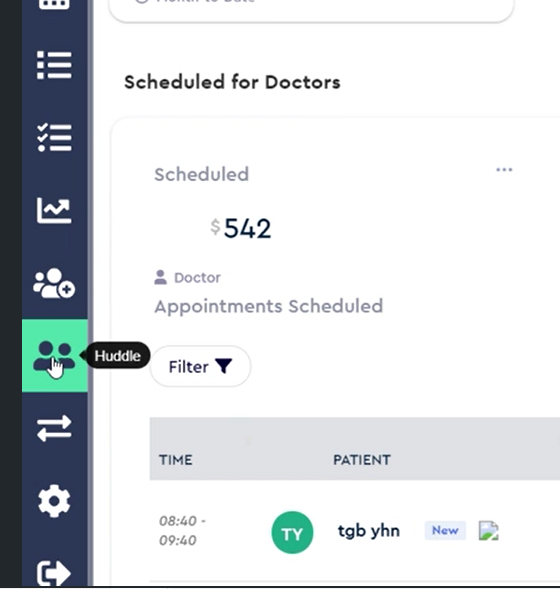
Patients with missing home phone numbers will appear in the Huddle > Patients with Incomplete Info panel.

Communication Settings
You can now block the numbers you no longer want to receive communication from. To do so, you will go to the Comm Center at the bottom left-hand side of the page. From the patient message, you will select the 3 dots, allowing you to Block the contact.


Blocked numbers can be managed under the Blocked Numbers setting, which can be found under the general settings.


Communication Logs
You can now filter the Communications Logs page by going to the Person Icon drop-down, selecting Communications, and then Filter Campaigns. Please make sure the date range is set to reflect the time when Campaigns were sent out. 

Team Messaging
You can now edit and delete team chats. You can find this at the bottom left-hand side of the page. You will hover over the person icon until the 3 dots appear, allowing you to edit or delete the message.


Tag Management
We have created built-in system tags like Premedicate, Asktoarrivearly, and dnr, etc.
These built-in tags cannot be deleted from tag management. You can add these tags to the patient through the patient overview.
Selecting Tag Management in this window will also take you to all active tags.


Forms
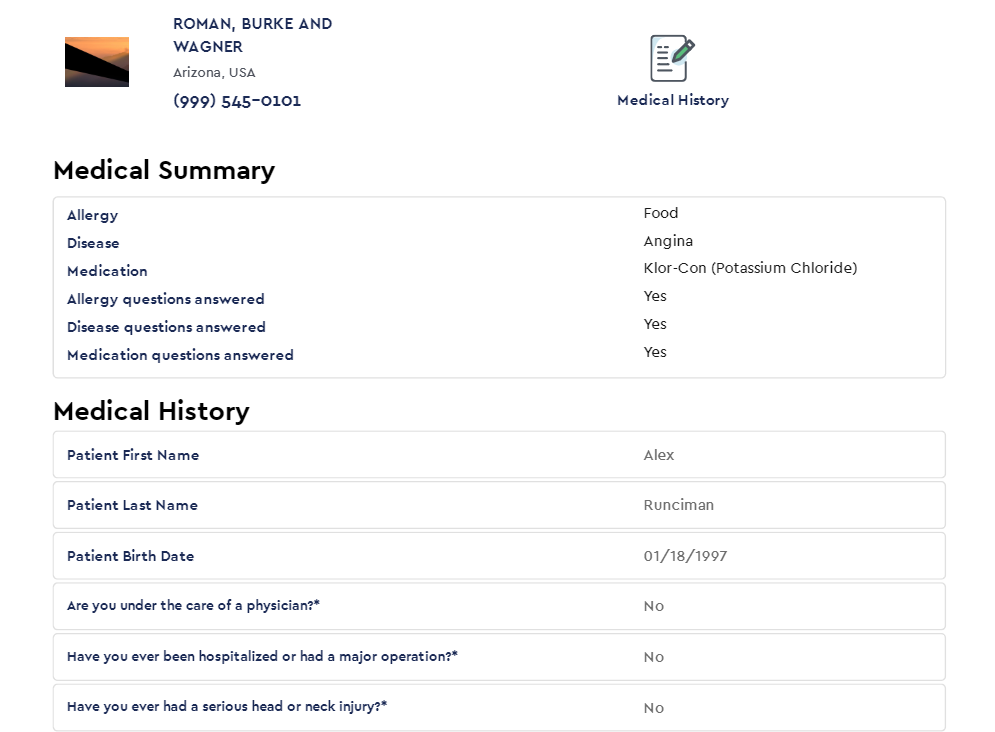
Once the patient has completed their forms, you will see the medical summary at the top of the generated PDF of the medical history form.
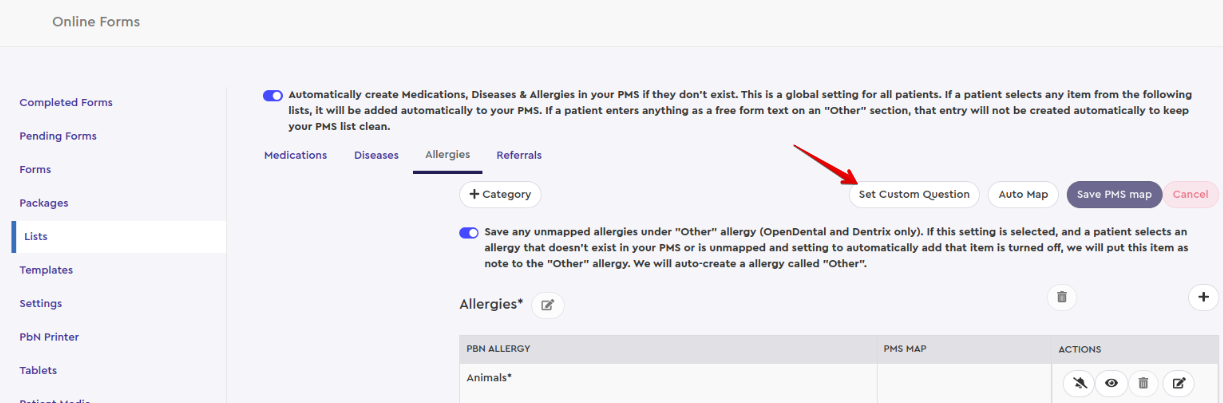
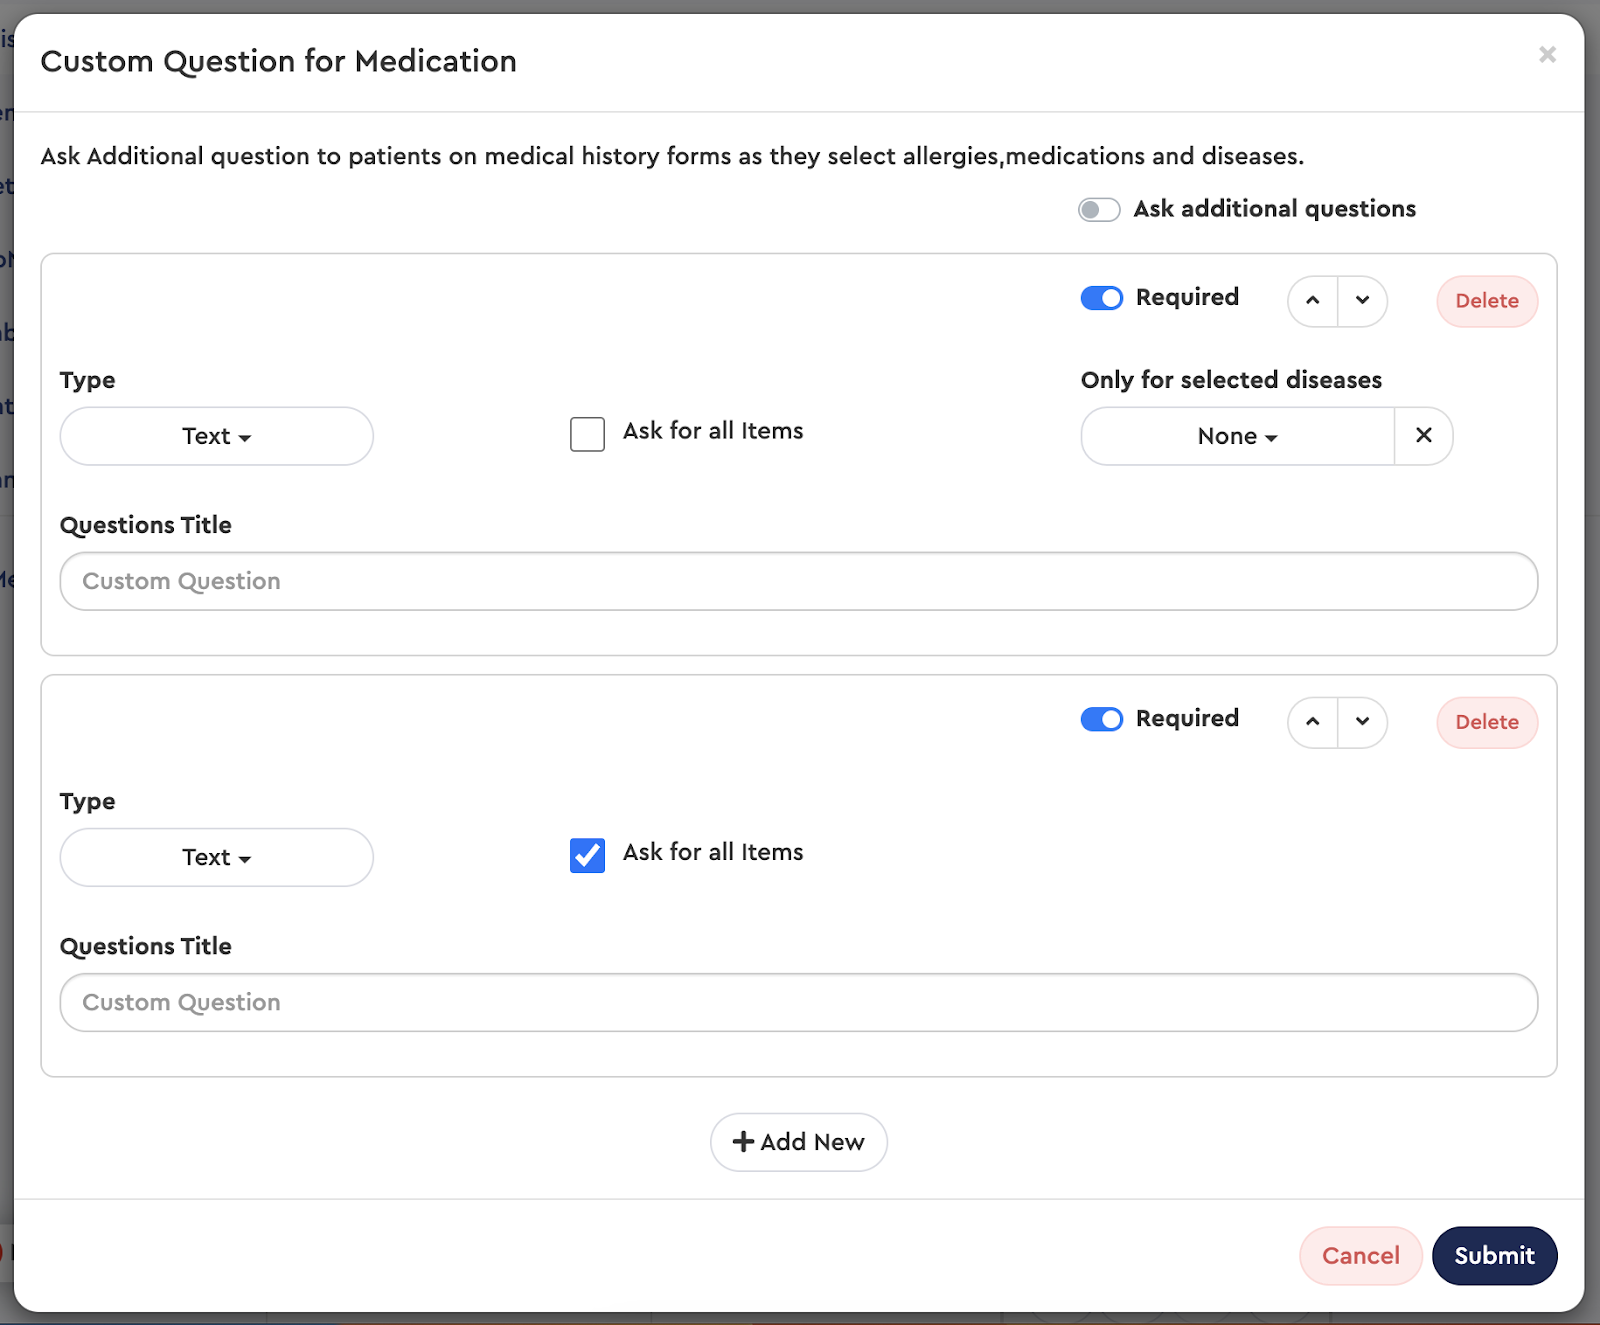
You can now also Set Custom Questions within forms for the Medications, Diseases, and Allergies tab. To do so, you will need to select Forms at the top of the page, followed by Lists on the left side of the page.
- These custom questions can be text and date-type questions.
- Patients will then be prompted to answer these questions if they select an item from the Medications, Diseases, and Allergies list on the medical history form.
Treatment Plans
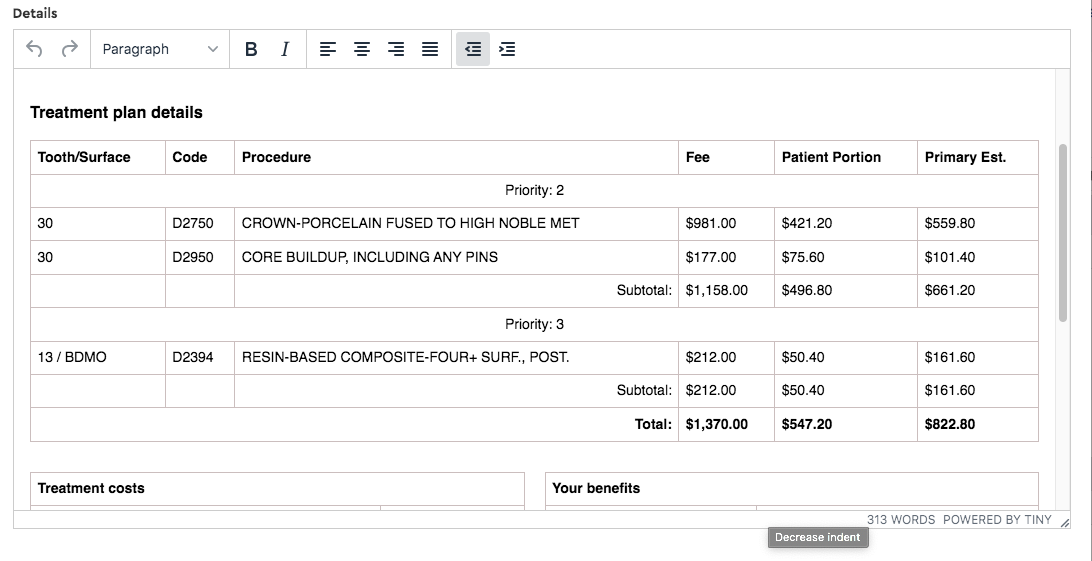
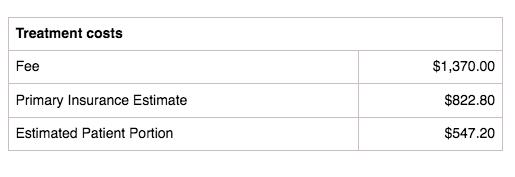
When sending Treatment Plans to patients, it should also show the Insurance Portion and Patient Portion. To find this, you will go to the Patient Overview > Treatment and select Send Form. Once it has been pulled up, you will need to select Show Detailed Fees in order for the Insurance Estimate and Patient Estimate to appear. *Note: The Insurance Portion will only show for Open Dental and Eaglesoft users at the moment.*


- Fee
- Primary Insurance Estimate (displayed only if the value is not zero)
- Secondary Insurance Estimate (displayed only if the value is not zero)
- Discount (displayed only if the value is not zero)
- For Open Dental, Discounts will only be displayed for "Saved" TX plans, not active TX plans.
- Insurance Estimate
- Patient Estimate
Consents
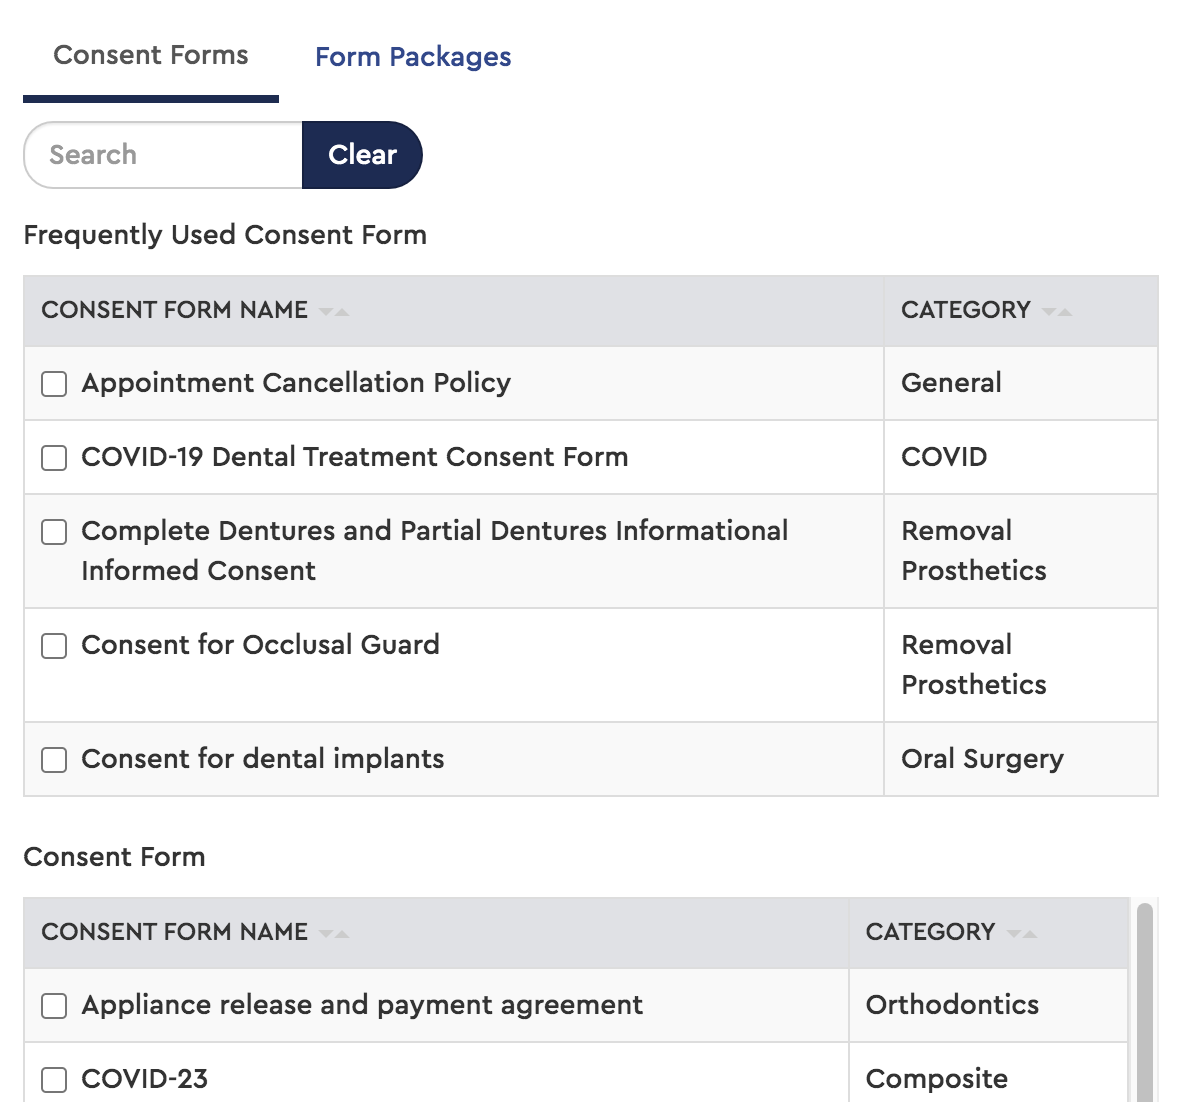
When sending consents to patients, depending on how often consents are used at your practice, you will see an option for the top 5 consent forms under the Frequently Used Consent Forms section. This can be found by going to the Comm Center and selecting the Send General / Consent Form. Lastly, select the + Consent option and see the Frequently Used Consent Forms section.


Payments
Under the payments tab, we have added the payment type so you can easily distinguish how the patient paid their balance (ACH or Card, etc.)

Online Appointment Booking
The Appointment settings page will now allow practices to set appointment time intervals of 10 minutes or 15 minutes. This can be found by going to Appointments > Settings and scrolling down to Appointment Availability.


RevenueIQ
ASAP List
From Revenue IQ, you can now find an ASAP list of patients with Services Scheduled. To add patients to this list, they must be tagged ASAP in the Patient Overview. You will find the ASAP list on the Summary page of Revenue IQ.

