
Latest releases and product enhancements
Campaigns
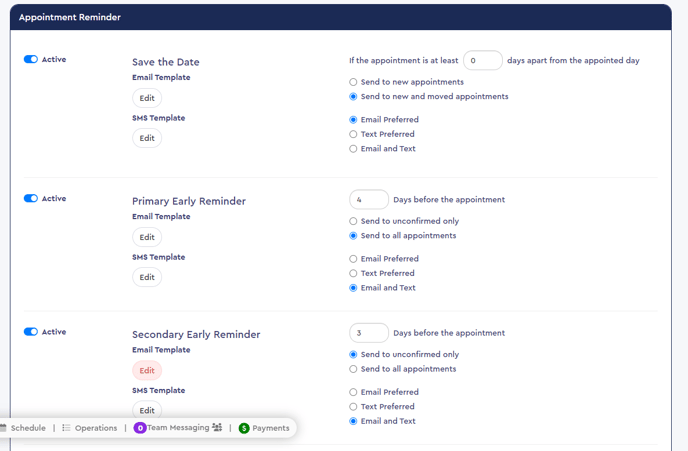
Appointment Reminder Campaign
-
- You will have the option to send the "Primary Same Day Reminder" and "Secondary Same Day Reminder" only to patients with Confirmed Appointments.

- You will have the option to send the "Primary Same Day Reminder" and "Secondary Same Day Reminder" only to patients with Confirmed Appointments.
Setup notifications days/hours without restriction
- You can now set up reminders to trigger days/hours before the appointment without any limits.
- You can set “Save the Date” to be triggered even if you are booking an appointment for the next day.
- The system will restrict you if you configure the reminders to go on the same day so the patients do not end up receiving multiple notifications on the same date.
- However, you can configure “Save the Date” and any 1 reminder notification to go out on the same date.
- You can now set up custom campaigns even more than 4 weeks in advance without any restrictions.
New Patient Window
- Discover the enhanced PbN Patient Window with a new layout designed for effortless navigation.
- Enjoy user-friendly accessibility with streamlined updates for easier feature access.
- Experience a more intuitive interface that prioritizes efficiency and clarity.

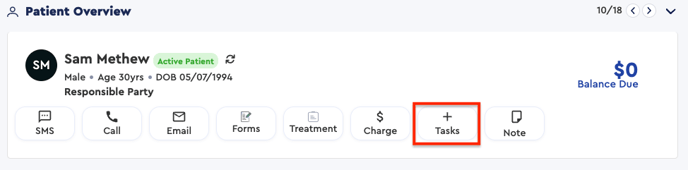
Quick Action Buttons
You can perform the following options using the quick action buttons.
- SMS
- Clicking the SMS button should show the numbers available for SMS.
- Next to the number, you should also see a green tick or red warning icon denoting if it's a valid number that can receive SMS or if it is invalid or a landline number that cannot receive messages.
- Clicking on any number will open the Comm Center.

- Email
- You can send emails to patients on their email addresses or securely via the patient portal.
- Next to the email address, you should also see the green tick or red warning icon denoting if it's a valid or invalid email.

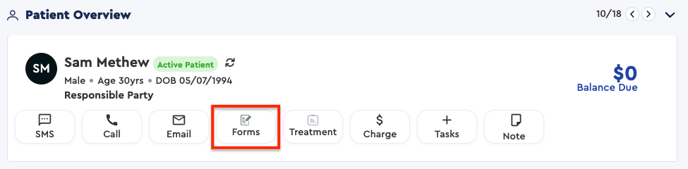
- Forms: Using this option, you can send forms to the patient.
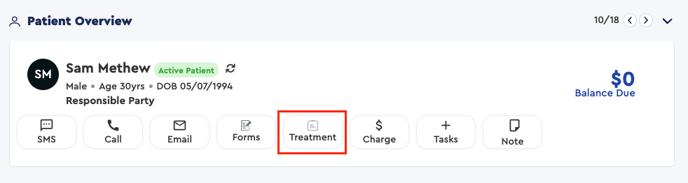
- Treatment: Using this option, you can send treatment plans to the patient.
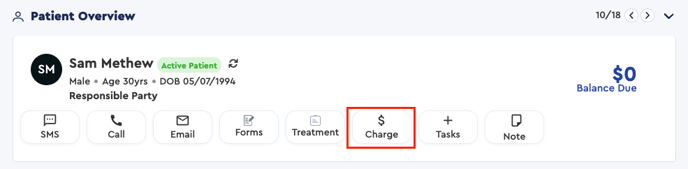
- Charge
- Using this option, you can charge a patient's card or add a new card for a patient.
- You can also send payment requests to the patient for a custom amount or pending balance.
- Task
- Clicking this button will open a window to create a task.
- You can select different task types and create tasks.
- For the Treatment Follow-Up type, you will have to select a treatment to create a task.
- For broken appointments and the pre-appointment task type, the system will ask you to select an appointment for which you want to create a task.
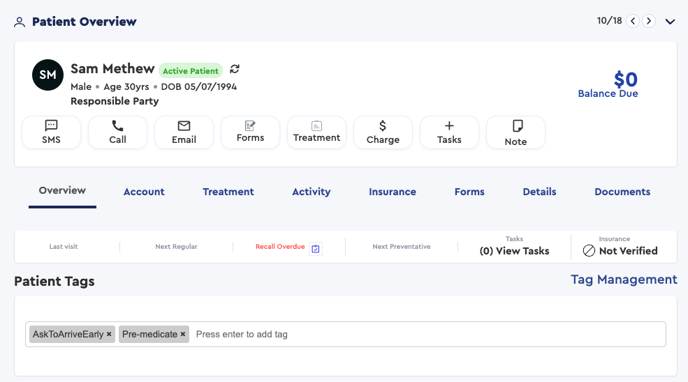
Overview Tab
- You will see the most prominent information on the top, such as:
- Last Visit
- Recall Overdue date
- Count of Open tasks
- Insurance status
- You will also have the option to apply tags.
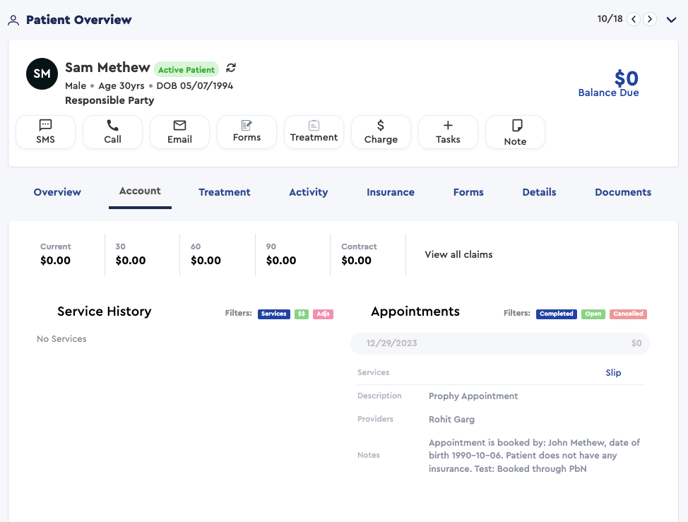
Account Tab
- At the top of this tab, you will see financial information, including the pending balance and all the claims for that patient.
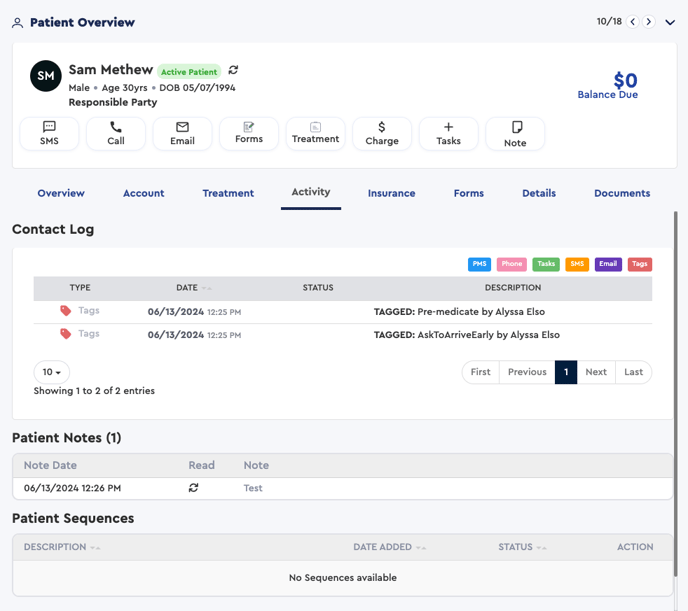
Activity Tab
- You can see all the communication logs and history, such as
- Contact log
- Patient Notes
- Patient Sequences
Grow 2.0 iOS App
New Improved Design
Book Appointments: You can now book appointments from the app for new and existing patients.
Team Messaging: Communicate with your team via in-app messaging.
Enhanced Patient Messaging: Send form invites, close conversations, and mark conversations as unread.
Add Patients: You can add new patients from the home screen using the '+' icon.
Enhanced KPIs: Extended KPIs for PracticeIQ and RevenueIQ with more filters.
Manage Patient Cards: You can manage patients' payment cards and charge them from the patient profile.
Forms Invite: Send forms to patients from patient messaging and the patient profile.
Intuitive Dashboard: A new dashboard to show important KPIs from the last 2 days and view action required and notifications.
Updated Patient Profile: A new patient profile with an improved design and performance.
Navigating the Grow App
Home Screen
- This is the first screen that you see after login
- On the top of the home screen, you can view the most prominent KPIs, such as Pending Forms, Canceled Appointments, Unconfirmed Appointments, Recalls Due, Patients Going Inactive, and new patients seen.
- You can see the latest action needed with the option to view all.
- You can book a new appointment or add a new patient by clicking the “+” icon at the top right corner.
- Using the menu at the bottom, you can navigate to different screens.
- You can change the practice from the header top left corner.


- You can view ongoing conversations with the patients.
- You can start a new conversation.
- Option to search and filter the patient chat.
- You can perform the following additional operations from a patient message: send a review request, Send a Payment request, and send a form invite.


- From the patient message, you can now send payment requests to the patient.
- You can send payment requests for the Current balance amount and Custom amount.
- You can choose to send the payment request via SMS or email

- From the patient's message, you can send forms to the patient.
- You can send a General form or consent form.
- You will see the recommended forms initially, but you can also choose to add additional forms to the list for sending.


- You can view the phone call log on this screen.
- For the existing patient in the call log, you can click and navigate to the patient profile.
- For unknown numbers, you will get an option to add those as a new patient.
- You can also tap on the message icon in the call logs to send a message using patient messaging.


- List View
- You can view the list of appointments for the current day.
- You can confirm the appointments using the Confirm button.
- You can search and filter the appointments via status and providers.
- You will have the quick option of a date slider to view appointments on different dates.
- Operatory Calendar View
- View the appointments operatory-wise in the calendar view.


- You can view all your Practice IQ built-in dashboards on your mobile device.
- Using the dropdown on the top, you can select a different dashboard to view data.
- You can filter the dashboard data using date range, compare between dates, and filter using providers.


-
- You can access the notifications using the bell icon on the home screen's top right corner.
- From the top, you can filter messages by Unread or All notifications.
- Clicking on any notification from the list will show the details about that notification.
- For the submitted form's notification, you will get an option to view the submitted form on the web app using the “Open Web App” button
- You can filter the notifications using notification types like Appointment Request, Appointment, Form, Payment, and Review.


-
- You can search for a patient from the home screen using the search icon and open the patient profile.
- You can also open a patient profile by clicking on the patient's name in the messaging.
- On the top section of the patient profile, you can view the patient's personal information.
- There will be an option to send an email, send a message, and call the patient.
- The call option will initiate the call using the mobile network.
- You will also get the option to add a task and notes for that patient.
Overview Tab
- You can view information like Last Visit, Next Recall Due, Next Regular, Benefits Left, Next Preventive, and Number of Open Tasks.
- You can search and apply patient tags.
- Remove already applied tags.
Patient Tasks
- You can view Open, In Progress, and Closed tasks
- You have the option to log contact and close the task.
- You can view the pending forms for a patient.
- For pending forms, you can send reminders, mark the forms as submitted, or remove the form for the patient.
- You can also view the completed forms for that patient.
- You can view the upcoming appointments for a patient
- You now have the option to book an appointment and charge the patient from the new patient profile screen.


Payment Method
- You can add a patient’s debit/credit card.
- View the list of added cards.
- Select a card and charge a patient by entering the amount and charge description.
- After charging the card, you can download the receipt or send the receipt to the patient’s email.
- You can also delete the selected card.


- You can book an appointment from the home screen using the “+” icon on the top right corner, or you can also book an appointment from the Patient profile.
- Booking appointments for new patients.
- Select the consultation type.
- Select a doctor to view and select its available time slot.
- Enter patient information like Name, DOB, Phone number, Email and Notes.
- Click on the “Confirm Appointment” button.
- Booking appointments for existing patients.
- Select the consultation type.
- Select a doctor to view and select its available time slot.
- Search and select a patient to book an appointment.
- Click on the “Confirm Appointment” button.


PbN Payments
PbN payments are now here, too. Here are some benefits and additional information on setting it up.
- No Platform Fees: Practices can now process transactions seamlessly without platform fees, maximizing profitability and resource allocation.
- Flexible Surcharge Rates: Practices have full control over surcharge rates, ensuring fair customer coverage of transaction costs while prioritizing convenience.
- Precision Surcharging: With precise configuration, avoid surcharging errors, adhering to regulations in US states and Canadian provinces without risking non-compliance.
- In-Office Payment Convenience: Accept payments effortlessly in-office via a Point of Sale (POS) system, reducing wait times and enhancing customer experience.
Click here for additional setup instructions.