Stay up to date with the latest features.
Comm Center Enhancements
Translating Messages
Outgoing Messages: Easily translate your outgoing messages with our new "Translate Your Message" option. Upon clicking the translate option, you will be presented with a list of languages to choose from. The system will convert the typed sentence into the selected language.


Incoming Messages: Translate incoming messages from any language to English effortlessly. You can either select the "See Translation" option below the incoming text message or click the three-dot menu to access the "See Translation" option. In both cases, the message will be translated into English. Once the translation is complete, the translated text will persist alongside the original language text.

Forms Evolution
Propagate (Copy) Forms and Consents
- Copying Forms: You can now easily duplicate custom forms between different practice locations by accessing the three-dot menu. This feature eliminates the need to recreate forms, saving time. When selecting the copy option, a pop-up will show the form's name and a list of practices. Each practice will have a dropdown menu displaying associated PMS folders. If the current folder name matches a folder in the dropdown, it will be automatically selected. You can update the folder before clicking the Propagate button. If no matching folder is found at the destination, the dropdown will remain blank and highlighted in red.

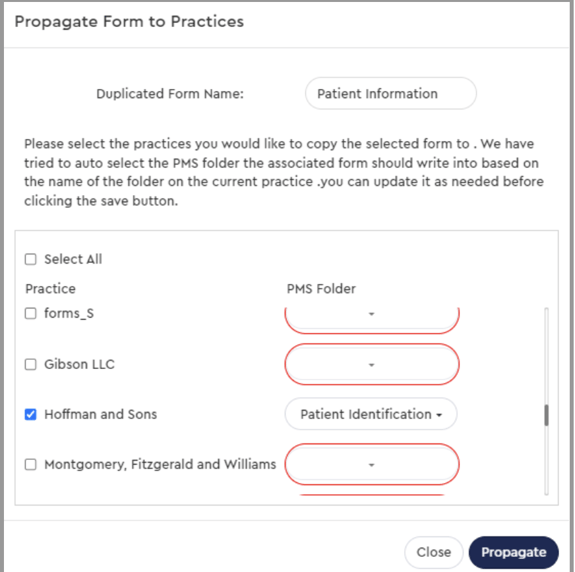
- Copying Consents: To copy a custom consent between locations, use the three-dot menu. Selecting the copy option will prompt a pop-up showing the consent's name and a list of practices. Each practice will have a dropdown menu displaying its associated "Category Name" for consent forms. If the current category name matches a category in the dropdown, it's automatically selected (Exists). You can update the category before clicking the Propagate button. If there's no matching category in the destination location, the dropdown will be blank and highlighted in red (Will create).


- Displaying Forms in a Specific Order: You can now customize the order of forms on the patient's submission portal. Simply access the "Edit Form Order" button under Forms > Forms tab. A pop-up will show the list of forms, allowing drag-and-drop rearrangement. Upon saving, each form receives an order number, determining its display sequence. New forms are added to the end of the order, duplicates follow suit. Deleting a form adjusts the order sequence accordingly. Deactivated forms maintain their position. Treatment Plans and Consent forms appear below the last form in the sequence.


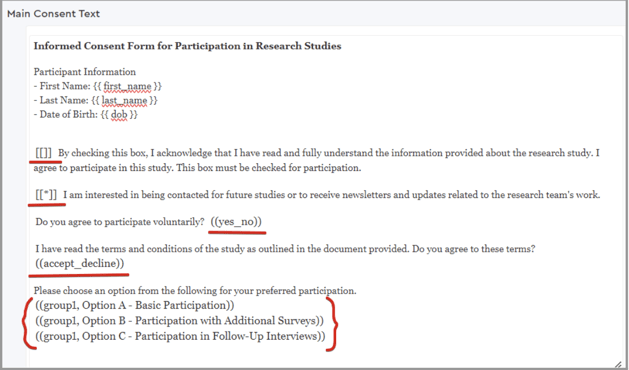
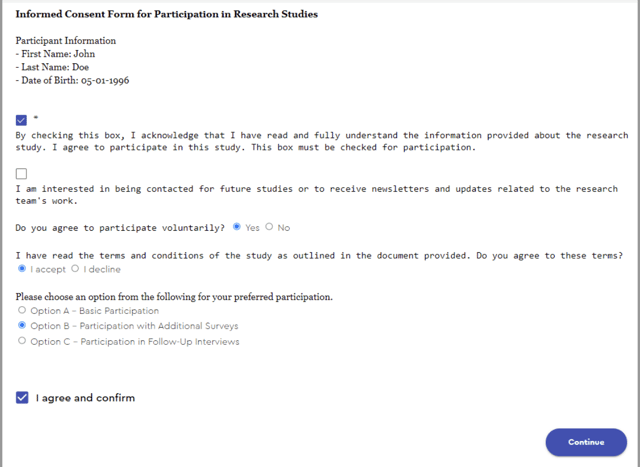
- Optional or Elective Checkboxes in Consents: Customize consent forms to include optional checkboxes, allowing patients to decline the form. Use custom tags like ((yes_no)) or ((accept_decline)) to display radio buttons for opting in or out. Add an asterisk to the existing checkbox control [[*]] to make it optional, while the existing checkbox control [[]] remains mandatory. Introduce additional brackets [[]] for the same checkbox. Include radio button options under labels like ((group_name, radio text)), making it a required field with multiple options associated with specific group names. Radio buttons provide a list of options, allowing users to select only one.
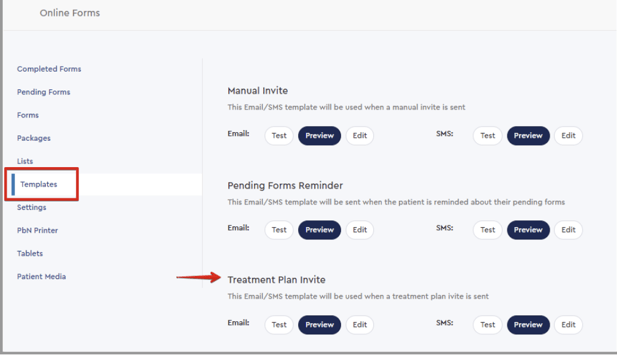
- Treatment Plan Invite: Send Treatment Plan via separate email and SMS template. We previously used the manual invite templates, whereas the new treatment plan templates allow for further customization when sending treatment plans.
Patient Flow & Team Messaging
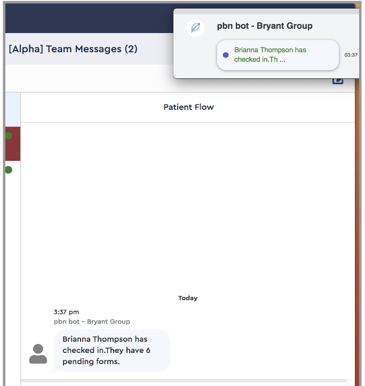
- Check-in messages now include pending form count for enhanced communication.
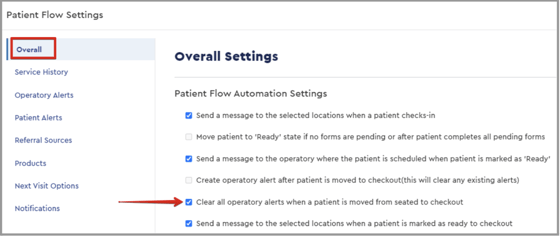
- Automatically clear alerts as patients move through the checkout process for improved patient flow.
Payments
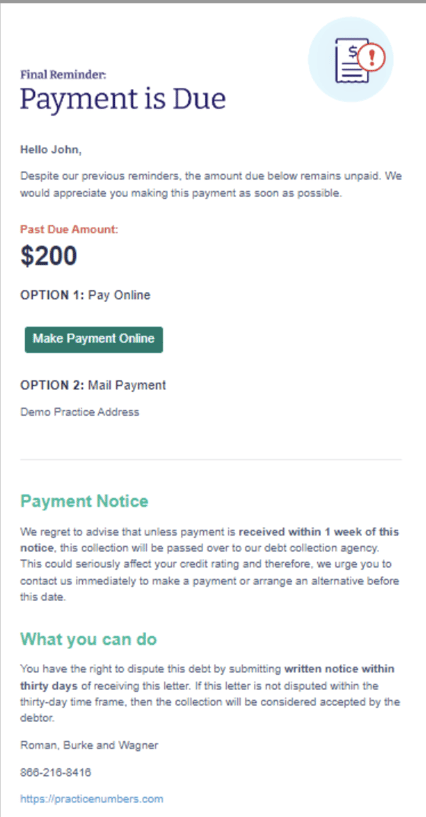
- Send Collections Notice: Send a "Collections Notification" email to exhausted patients via Payments > Summary > Follow-up Exhausted.

- Payment Widget: Existing patients accessing the payment portal using their first name, last name, and date of birth can view and pay their outstanding balance if their information matches records in your practice.
Upload Statements
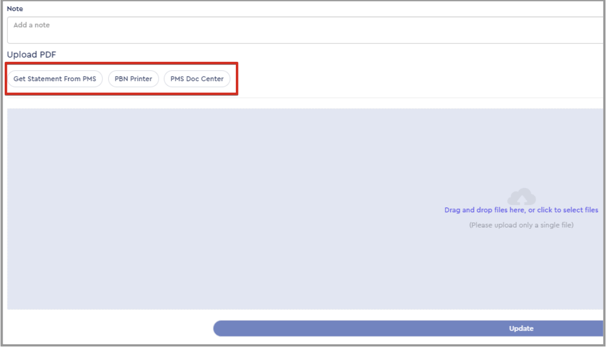
- Latest Statement from PMS: Open Dental and Eaglesoft users can retrieve statements directly from the Practice Management System. Dentrix users need to know their Document's password for this feature to work.
- PBN Printer: Users can upload PBN printer PDFs as statements, useful if statements are printed using the PBN printer.
- Document Center: Statements from the PMS Document Center can now be uploaded. Dentrix users need their Document's password for this feature, and PBN can fetch only PDF files from the Document Center.
Campaigns & Email Templates
Appointment Reminders Campaign: The 'Save the Date' email reminder design is updated. The frequency for the 'Day Before Reminder' is now visible under the 'settings on when to send' button for easier review before saving or activating the campaign.


Email Localization
- Add new Spanish language templates: Easily add new Spanish templates for emails. When editing, click the + button next to EN language to add a new language template.
Three ways to add a new language template:
1. Start from a blank template.
2. Copy content from the English template.
3. Automatically translate using AI.
- Resetting existing templates and importing Spanish templates: Reset feature and campaign templates to import Spanish translations.
- Sending localized messages:
- Campaigns and automated messages use the preferred language of the patient set in the patient window.
- For automated emails, if the Spanish template is not present we will default to English.
- For manual messages from the Comm Center, select the Spanish template from the SMS templates.
Practice IQ
-
KPI Tables on Custom Dashboards: Easily analyze tables on custom dashboards, as the first column and first row of the table will remain frozen even during scrolling.
Revenue IQ
Show Filters > New Filters Available
- Preferred Language: Filter patients based on their preferred language set in PMS (Open Dental, Dentrix, Eaglesoft) for efficient communication.
- Review and Rating: Locate patients who have left reviews on Google or Facebook (if tagged on the Reputation page), and filter by ratings from 5 stars to 1 star.
- Email/SMS Subscription Status: Filter patients by "Subscribed" or "Unsubscribed" status in your PMS for targeted communication.
- Services Scheduled Confirmation: Easily identify patients with confirmed or unconfirmed future appointments.


PBN Settings & Miscellaneous
- User Notifications > KPI Emails > Include CSV File: You can now include CSV file attachments in user notification KPI emails, including both built-in (Daily, Weekly, Monthly) and custom templates.

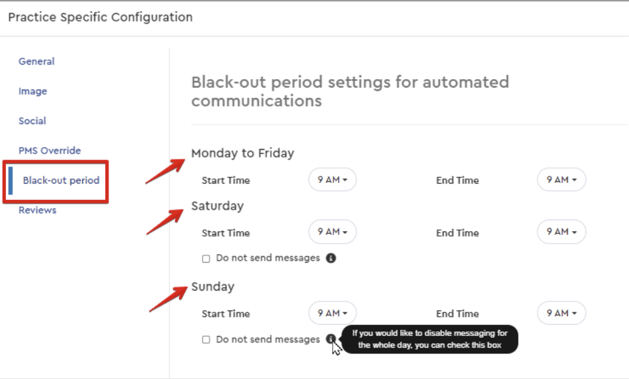
- Communication Settings > Black-out period for weekends: You can now configure Black-out periods for weekends in Communication Settings to halt patient messages. Specify start and end times for Saturday and Sunday. If you wish to cease all messages on weekends, check the "Do not send messages" option. These settings apply universally to automated text messages.
- Communication Settings > Language settings: The language settings have been relocated from Forms to Communication Settings.

- PBN Failure Sync Status: The status of the PBN Bridge is indicated by a dot reflecting the WebSocket connection's status, with colors denoting different scenarios:
- Green: Sync is up, live WebSocket connection is up (Online).
- Yellow: Sync is up, WebSocket connection is partially down (Online).
- Red: Sync is up but WebSocket connection is fully down (Online), or both sync and WebSocket are down (Offline).
- Green Dot: No message.
- Yellow Dot: "PbN Bridge seems to be down. Writebacks may be delayed."
- Red Dot: "PbN Bridge seems to be down. Writebacks may be delayed."

